Ceiling Fans with Lights Installation Requirements and Limits
Ceiling fans with lights need installation requirements that cover both the fan assembly and the light connection. A suitable installation depends on support, clearance, wiring, mounting, and whether local electrical conditions need a qualified electrician.
The main question is not only whether power is available at the light fixture. A ceiling fan with light also needs a mounting point that can handle movement, a fan-rated box or suitable structural support, wiring that can serve the fan motor and light operation, and enough clearance for blades, housing, and the light drop. For broader selection context before installation checks, use the ceiling fans with lights hub.
Replacing an existing light fixture can be possible only when the existing light point is also ready for fan load, control needs, and room spacing. Available power does not prove structural readiness, so the first boundary is whether the ceiling point is light-ready only or fan-ready as well.
The next check should treat the location as a condition-based fit problem: support, clearance, wiring, and mounting method must be verified before the installation path is chosen.
Installation conditions before replacing a light fixture
You can replace a light fixture with a ceiling fan with light only when the location, support, wiring, switch setup, and clearance are suitable. The existing light point may be a starting point, but it does not prove the ceiling is ready for a fan in motion.
An existing light point may provide power while still lacking fan-rated structural support. The electrical box may need to be a fan-rated box, fixed to a suitable joist or brace, and positioned where the fan and light can operate without contact risk. Wiring and switch setup also need review because fan speed, light operation, and separate control may depend on the existing circuit and control layout.
Support and clearance should be checked before treating the replacement as suitable. Verify these installation conditions before using the existing light point for a ceiling fan with light:
- Fixture position: the mounting point should place the fan where airflow, blade path, and light drop can work without creating a room clearance problem.
- Electrical box type: the ceiling box should be fan-rated or otherwise confirmed as suitable for the support and movement of the fan assembly.
- Structural support: the mounting point should connect to a joist, brace, or suitable structural fixing rather than relying only on a light-duty box.
- Switch setup: the switch and control layout should match the intended fan and light control, especially when separate control or a remote receiver is needed.
- Ceiling material: the ceiling surface should allow secure mounting without hiding weak support, damaged material, or uncertain fixing points.
- Joist access: access to framing or a brace may affect whether the location can be made fan-ready without unsafe assumptions.
- Room clearance: blade path, wall spacing, furniture position, and light drop should leave enough usable clearance for the fan and light assembly.
Existing wiring, switch control, and fixture location limits
Existing wiring, switch control, and fixture location determine whether replacing a light fixture with a ceiling fan with light is straightforward, limited, or may require changes. The presence of electrical wires alone does not confirm that the installation is ready for the intended fan and light operation.
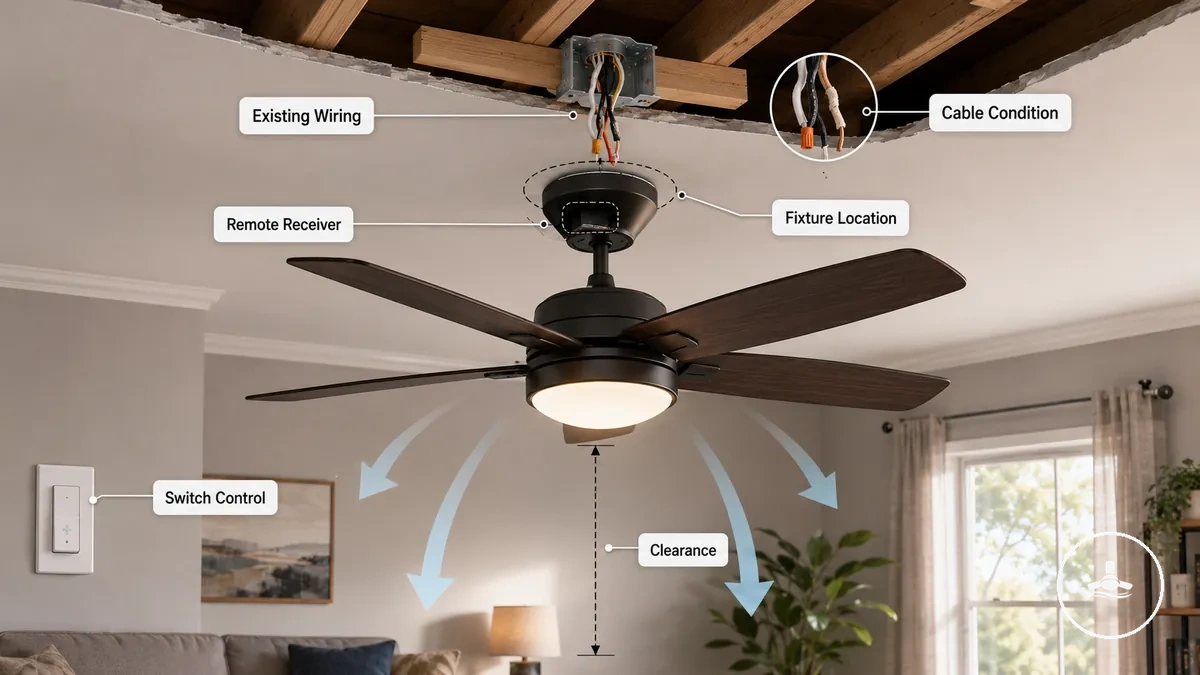
Existing wiring may support only part of the required control setup, depending on the cable condition and switch arrangement. Remote receiver placement may also depend on the available canopy space. Fixture location should still provide suitable airflow and clearance, even when power is already available.
- Switch control: the wall switch should suit the intended fan and light control arrangement; separate fan and light control may depend on the existing wiring.
- Remote receiver: available receiver space inside the canopy may limit whether a remote receiver can be installed.
- Cable condition: existing wiring may need inspection when the cable condition is uncertain.
- Fixture location: the fixture point should support appropriate airflow and provide enough clearance for the blade path.
- Clearance: nearby walls, furniture, or ceiling features should not restrict fan movement or light position after installation.
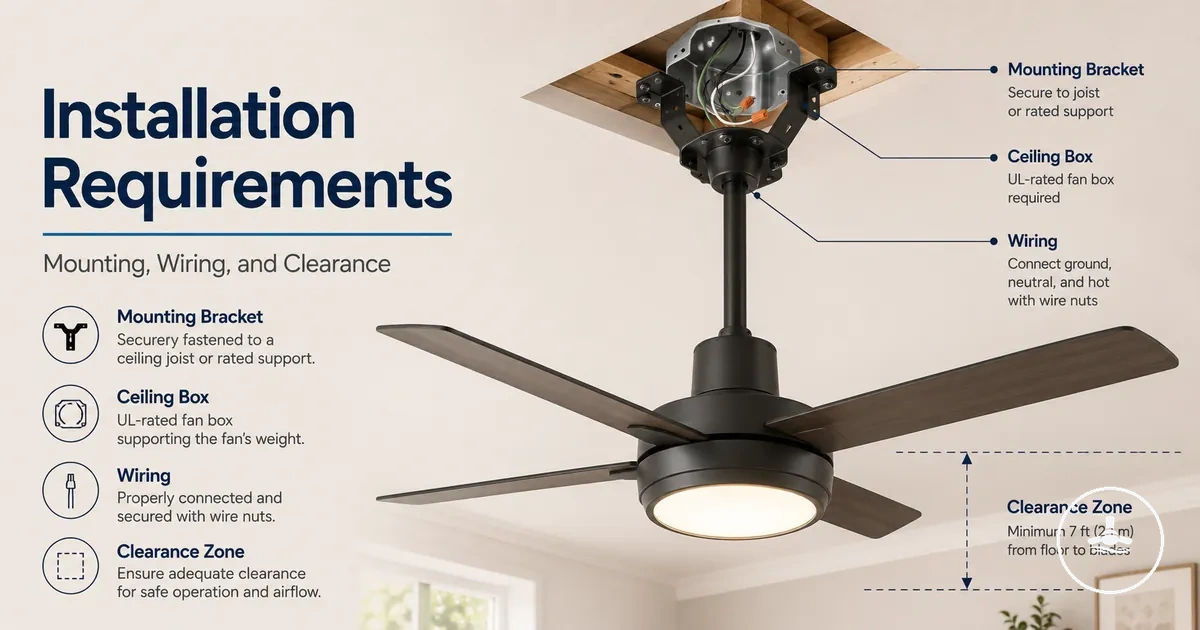
Ceiling structure and fan-rated box requirements
A ceiling point that supports a fan in motion requires fan-rated support rather than a standard light-ready connection. Whether a mounting point is suitable depends on the ceiling structure, fan-rated box, framing attachment, and the way the assembly is supported.
A fan-rated box is intended to work with appropriate structural support, such as a joist or brace, instead of relying only on a standard ceiling box. The mounting point should be secured through suitable framing so it can manage fan weight and vibration load during normal operation. In contrast, a light-duty junction box may provide electrical connection without being suitable for the movement and support requirements of a ceiling fan.
Exact suitability can vary with the fan, the condition of the ceiling structure, and local installation requirements. Improvised structural support should be avoided because the mounting point should match the installation conditions rather than assumptions.
| Support Part | Load-Bearing Attribute | Acceptable Condition or Installation Risk |
|---|---|---|
| Fan-rated box | Designed to support fan movement and vibration load | May be suitable when correctly attached; a standard junction box may present installation risk. |
| Ceiling box attachment | Secure fixing to a joist or brace | Support depends on appropriate structural fixing rather than the ceiling box alone. |
| Ceiling structure | Stable framing at the mounting point | Weak or damaged framing may reduce installation suitability. |
| Fan weight and movement | Continuous vibration load | Support requirements vary with the fan, ceiling condition, and installation context. |
| Ceiling material | Compatible structural support | Surface material alone does not confirm a fan-ready mounting point. |
| Access to framing | Connection to a joist or brace | Limited access may restrict available installation methods. |
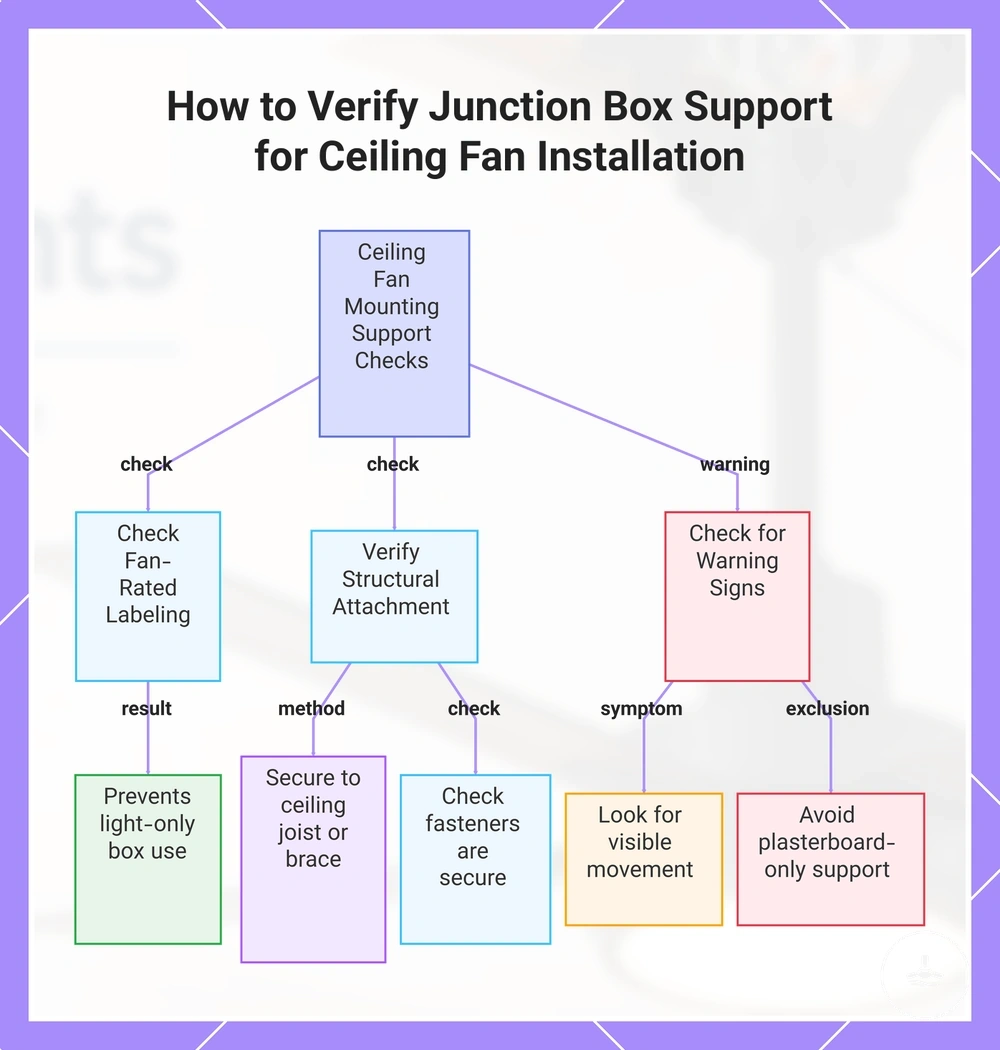
Junction box support and ceiling joist attachment
The junction box should be attached to suitable structural support, such as a ceiling joist or brace, before it is used to support a ceiling fan. A fan-rated labeling and secure structural fixing help identify a mounting point intended for fan movement rather than a standard light connection.
Older junction boxes or concealed fixings may require further inspection because appearance alone may not confirm suitability. Fan-rated labeling can be a useful indicator, but attachment to a ceiling joist or brace, secure fasteners, and the condition of the mounting point should also be considered when support is uncertain.
- Fan-rated labeling: verify the junction box is identified for fan support to reduce the risk of using a light-only box.
- Ceiling joist or brace: confirm the junction box is securely fixed to structural framing to reduce movement under vibration load.
- Fasteners: check that fasteners appear secure because loose attachment may allow unwanted movement.
- Movement: noticeable movement at the mounting point may indicate that the structural support should be assessed before installation.
- Plasterboard-only support: if the junction box appears to rely only on plasterboard, the structural attachment may need verification because the surface alone does not confirm suitable support.
This chart shows the key checks needed to confirm a junction box is properly supported for ceiling fan installation.
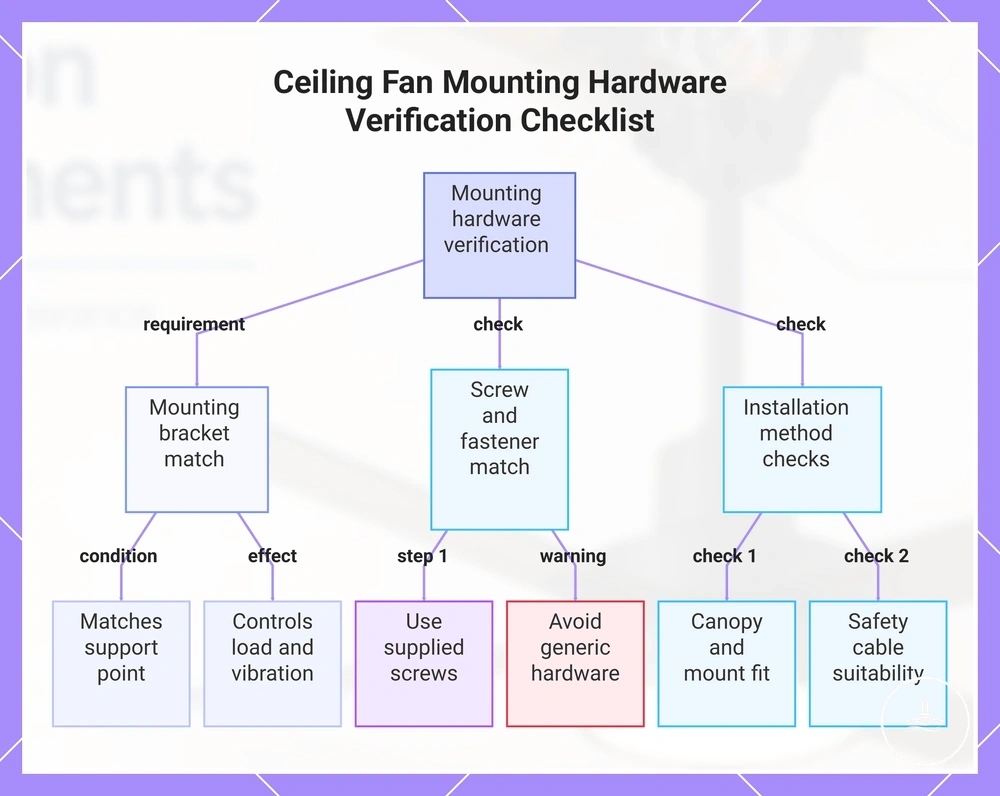
Mounting bracket and hardware requirements
A mounting bracket transfers the fan assembly to the fan-rated support point, helping control load transfer and vibration during operation. The mounting bracket must match the support point because mounting hardware cannot compensate for weak ceiling support.
Mounting hardware should match the fan, canopy, and selected mounting method. Compatibility may vary between downrod and flush mount installations, and any safety cable should be used only when it applies to the fan and the manufacturer instructions.
Verify the mounting hardware before installation:
- Mounting bracket: confirm the mounting bracket matches the fan-rated support point to maintain proper load transfer and vibration control.
- Supplied screws and fasteners: use the supplied screws and compatible fasteners intended for the fan because generic hardware may not suit the mounting condition.
- Canopy: check that the canopy fits the mounting bracket correctly and provides suitable clearance for the intended installation.
- Downrod or flush mount: verify the mounting hardware matches the selected downrod or flush mount interface rather than treating the two methods as interchangeable.
- Safety cable: where applicable, confirm the safety cable is suitable for the fan and mounting method, following the manufacturer instructions where provided.
This chart shows the key compatibility checks for ceiling fan mounting hardware before installation, covering bracket fit, fastener use, and installation method verification.
Clearance limits for safe fan and light placement
Clearance limits are suitable only when the blade path, light, walls, doors, and furniture do not create contact or headroom risk after installation. A ceiling fan with light may be centred in a room, yet surrounding walls, cabinets, doors, or furniture can still make the installation unsuitable if they interfere with safe operation.
The table below organises clearance conditions by floor clearance, wall clearance, blade path, and light obstruction. It links each fan part to its clearance attribute so potential collision risk or airflow obstruction can be assessed before installation.
Exact clearance limits depend on the fan model, room layout, ceiling height, light-kit drop, and applicable installation guidance. Verify the available space before installation rather than assuming a centred fixture point provides adequate clearance in every direction.
| Fan Part | Clearance Attribute | Acceptable Condition or Collision Risk |
|---|---|---|
| Blade path | Wall clearance | Blade movement should remain clear of nearby walls to reduce collision risk. |
| Fan assembly | Floor clearance | Headroom should remain suitable for the room and installation conditions. |
| Light-kit drop | Placement clearance | The light should not obstruct normal movement beneath the fixture. |
| Door and cabinet swing | Obstruction zone | Opening doors or cabinets should not enter the blade path or light area. |
| Furniture | Airflow obstruction | Large furniture may reduce airflow or increase contact risk when positioned close to the fan. |
For a broader review before installation, the weight and clearance safety checklist can help organise supporting checks alongside room clearance conditions.
Floor, wall, and ceiling clearance checks
Floor, wall, and ceiling clearance checks confirm whether a ceiling fan with light fits the room envelope without contact or headroom problems. Acceptable spacing depends on the fan dimensions, room layout, and nearby obstruction zones.
Each check should observe the fan’s blade path, light shade depth, and surrounding contact zones before installation continues to prevent blade contact, reduced headroom, or interference from furniture and door swing. Use these clearance checks to confirm usable space around the fan and light:
- Floor clearance: measure or assess the space below the blades and light to confirm that headroom remains usable for the room.
- Wall clearance: observe the distance from the blade path to nearby walls so the fan does not operate inside a tight contact zone.
- Ceiling clearance: check the space around the motor housing, canopy, and ceiling area so the fan and light can sit without obstruction.
- Light shade depth: compare the light shade depth with the ceiling height because a deeper light can reduce headroom beneath the fixture.
- Door swing: open nearby doors or cabinets to confirm they do not enter the blade path or light area.
- Furniture proximity: observe large furniture near the fan because nearby objects can restrict airflow or increase contact risk.
Low ceiling and flush mount installation limits
Flush mount installation can reduce the drop below the ceiling, but it does not remove support or clearance requirements. Suitability depends on the available ceiling height, blade clearance, light-kit depth, and the installation conditions at the mounting point.
A hugger fan or other low-profile mount may help reduce the distance between the fan and the ceiling, but the reduced drop can involve an airflow trade-off. Blade clearance and light-kit depth should still be assessed because available headroom and usable space vary with the room layout and fan dimensions.
The comparison below highlights the benefit of reduced drop alongside the remaining installation limits. Check low ceiling installation limits before choosing a mounting approach.
| Reduced Drop Benefit | Remaining Installation Limits |
|---|---|
| Flush mount or a hugger fan can position the fan closer to the ceiling. | Ceiling height, support, blade clearance, and light-kit depth should still be suitable for the installation. |
| A lower profile may improve available headroom in some rooms. | Reduced drop may involve an airflow trade-off depending on the fan design and room layout. |
Downrod and sloped ceiling installation conditions
Downrod and sloped ceiling installation depends on the ceiling angle, ceiling adapter compatibility, mounting support, and available clearance. An angled mount requires compatible hardware and should allow proper blade leveling while the mounting point provides suitable support for the installation.
Ceiling angle and downrod length influence blade leveling, light hanging height, and clearance around the fan. The appropriate drop length depends on the fan model, room dimensions, canopy compatibility, and the conditions at the current mounting point rather than a single recommendation.
Use these criteria to assess whether the current installation point is suitable. For broader guidance beyond this installation check, see sloped ceiling installation needs.
- Ceiling angle: confirm the sloped ceiling or vaulted ceiling angle is suitable for the intended angled mount because mounting feasibility can vary with the ceiling angle.
- Ceiling adapter: verify that the ceiling adapter or slope adapter is compatible with the mounting point and canopy because adapter fit affects installation feasibility.
- Downrod and blade leveling: confirm the selected downrod can support proper blade leveling and appropriate clearance for the installation conditions.
- Canopy compatibility: check canopy compatibility with the angled mounting arrangement because the canopy should suit the ceiling angle and mounting hardware.
- Light hanging height: assess the finished light hanging height because the combined downrod and light assembly may affect headroom and usable clearance.
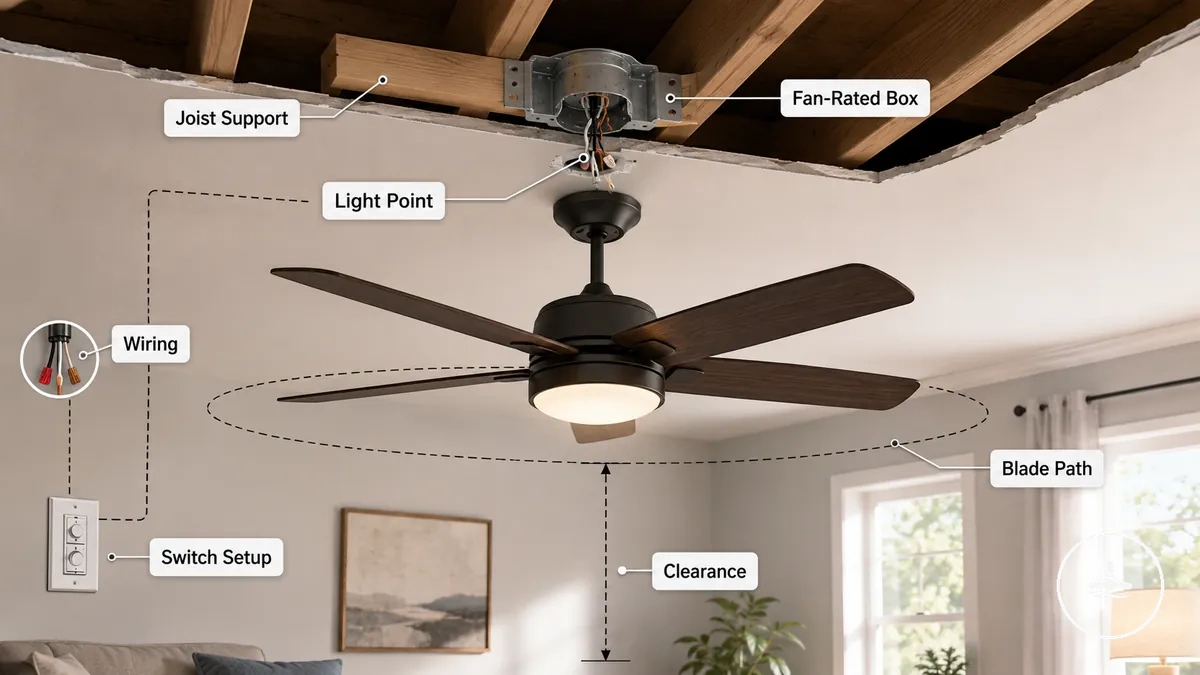
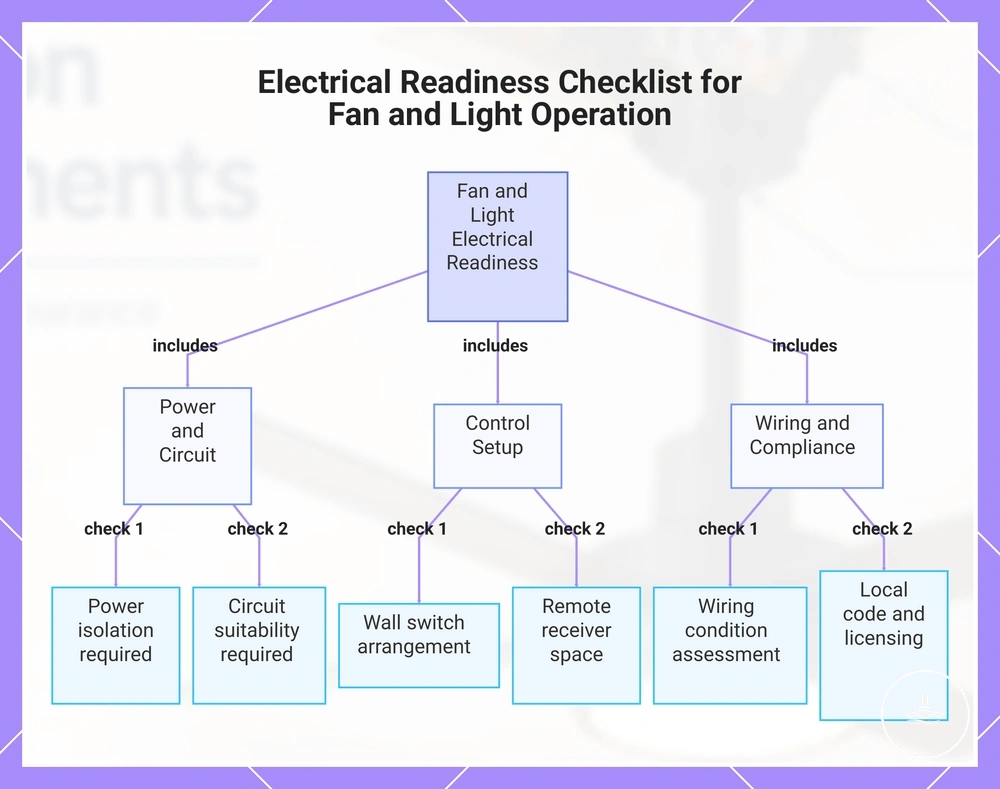
Electrical readiness for fan and light operation
Electrical readiness means the fan motor and light operation can be powered, controlled, and connected safely after the mounting point is confirmed as physically suitable. Power isolation, circuit suitability, wiring condition, and the intended control arrangement should be resolved before electrical connection work begins.
Electrical supply, control wiring, and available canopy space affect how the fan motor and light operation can be controlled. The wall switch arrangement, separate or shared fan-light control, remote receiver placement, and the condition of the fixed wiring may all influence whether the planned installation is suitable.
The checklist below organises readiness by power, control, load, and connection needs. It identifies electrical readiness only; complex wiring decisions and work that must comply with applicable local code or licensing requirements may require a qualified electrician.
- Power isolation: the electrical supply should be isolated before connection work to reduce electrical safety risk.
- Circuit suitability: the circuit should be suitable for the intended fan motor and light operation because unsuitable supply conditions may affect safe operation.
- Wall switch and control: the wall switch should support the intended separate or shared fan-light control so the selected operating method can function as planned.
- Remote receiver: the canopy should provide enough space for a remote receiver module when that control method is used.
- Wiring condition: the fixed wiring should be in suitable condition because damaged or uncertain wiring may require further assessment before connection.
- Local code and licensing: electrical work may need to comply with applicable local code or licensing requirements, which can require a qualified electrician depending on the installation.
This chart groups the essential readiness checks into power and circuit, control setup, and wiring and compliance categories.
Power isolation, circuit load, and code checks
Power isolation, circuit load, and code checks must be completed before electrical connection work begins because they help reduce shock, overload, and compliance risk. The checklist below identifies the key safety checks that should be confirmed before installation continues without providing electrical testing or connection procedures.
Local code, compliance requirements, licensing obligations, and wet-area conditions can vary by location. Where voltage verification or compliance assessment is required, the work may need to be carried out by a qualified electrician to support electrical safety.
- Power isolation and breaker: confirm the correct breaker has been isolated before connection work to help reduce shock risk.
- Voltage verification: where verification is required, it should be performed by a qualified person because incorrect verification may create electrical safety risks.
- Circuit load: confirm that the circuit load and circuit capacity are suitable for the intended fan motor and light operation to help reduce overload risk.
- Wet-area conditions: where moisture exposure is possible, confirm that applicable local code and compliance requirements have been considered because additional electrical safety conditions may apply.
- Local code and compliance: verify any applicable compliance or licensing requirements before electrical work proceeds, as some installations may require a qualified electrician.
Light wiring, remote receivers, and wall switches
The control setup determines how the fan and light can be connected and operated. Light wiring, the wall switch arrangement, and any remote receiver influence fan speed, light operation, and the installation path before electrical connections are completed.
Existing light wiring, canopy space, and receiver placement can vary with the fan model and the existing circuit. A remote-controlled setup may rely on a remote receiver or control module installed within the canopy, while a wall-control setup depends more directly on the available wall switch and control wiring. For more detailed electrical layouts, see wiring requirements for fan lights.
- Separate control: separate fan and light wires may allow independent fan speed and light operation, depending on the existing switch setup.
- Shared switch: a shared switch may control both functions together unless the selected control configuration supports separate control.
- Remote receiver: the remote receiver or control module should fit within the available canopy space because limited space may affect installation readiness.
- Dimming compatibility: dimming compatibility depends on the LED light, control setup, and fan design, so not every dimmer may be suitable.
- Control configuration: select the control arrangement according to the existing light wiring, wall switch, and canopy space rather than assuming one configuration suits every installation.
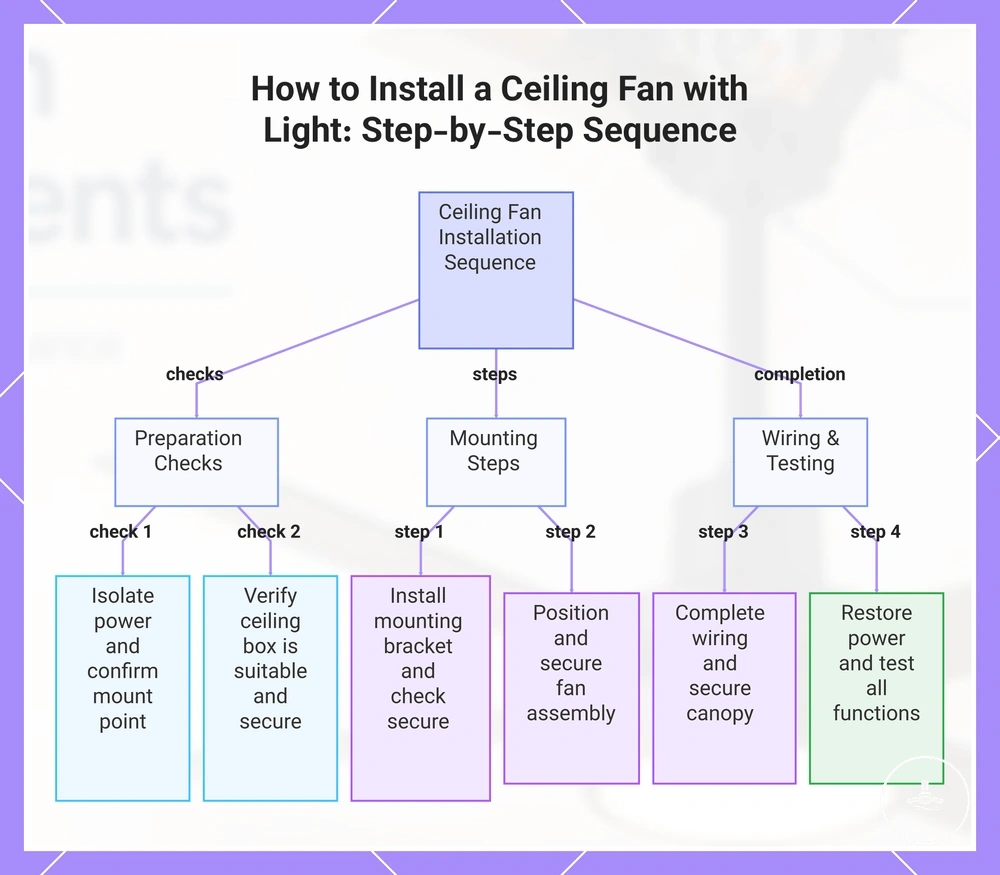
Installation sequence for a ceiling fan with light
The installation sequence begins only after support, clearance, and electrical readiness have been verified. Following the correct order helps organise preparation, mounting, connection, assembly, and testing while reducing the risk of installation problems that can result from bypassing a prerequisite check.
Electrical connection requirements vary with the installation and applicable local requirements. Where wiring connection or electrical verification requires specialist knowledge or compliance, the work may need to be completed by a qualified electrician.
- Preparation: Remove the existing fixture only after confirming the mounting point is suitable and power has been isolated. Verify that the work area is ready before continuing.
- Ceiling box preparation: Confirm the ceiling box is suitable for the intended installation and securely supported. Verify that the mounting point is ready for bracket installation.
- Mounting bracket: Install the mounting bracket using the intended mounting process. Check that it is securely attached before supporting the fan assembly.
- Fan assembly: Position and secure the fan assembly on the mounting bracket. Verify that the fan body is properly supported before electrical work continues.
- Wiring connection: Complete the wiring connection using the intended control configuration and receiver where applicable. This step may require a qualified electrician. Verify that all connections are secure before closing the canopy.
- Blade fitting and light fitting: Complete blade fitting and light fitting in the intended order. Confirm that the blades are balanced and all components are securely attached.
- Testing: Restore power only after installation is complete and perform a functional test. Verify fan operation, light operation, and the selected control functions before normal use.
This chart shows the sequential stages and key checks for installing a ceiling fan with light, from preparation to final testing.
Removing the old fixture and preparing the ceiling box
Removing the old fixture and preparing the ceiling box helps determine whether the ceiling point may be fan-ready. This preparation reveals the condition of the mounting point, support, and wiring before installation continues.
Power isolation should be confirmed before fixture removal or box inspection begins. If support verification or wire condition is uncertain, further assessment may be needed before the ceiling point can be treated as suitable for a fan.
- Power isolation: Confirm power isolation before removing the old fixture, then verify the preparation work can begin safely.
- Fixture removal: Remove the old fixture carefully and expose the ceiling box. Check that the mounting point can be inspected without assuming existing hardware can be reused.
- Box inspection and support verification: Inspect the ceiling box and verify whether its support may be suitable for a fan-rated installation before continuing.
- Wire condition: Observe the visible wire condition for signs of damage or uncertainty. If the condition is unclear, further assessment may be appropriate before installation proceeds.
- Surface preparation: Ensure the mounting surface is clean and unobstructed so the ceiling box and surrounding area are ready for the next installation stage.
Mounting, wiring, assembling, and testing the fan
Mounting, wiring, assembling, and testing the fan starts after the ceiling point has been confirmed as suitable. Keeping the mounting, wiring, and balance aligned throughout the installation helps maintain support, proper assembly, and reliable functional testing before normal operation.
Electrical wiring and receiver placement may depend on the fan design and installation conditions, and electrical work may require a qualified electrician. Complete the final testing only after the fan, blades, and light kit are fully assembled.
- Secure the mounting bracket: Fix the mounting bracket to the prepared support point and confirm it is firmly attached before continuing.
- Hang the motor body: Position the motor body on the mounting bracket.
- Confirm the motor body is correctly seated.
- Verify the support remains stable before wiring.
- Complete the wiring connection: Connect the wiring using the intended installation method.
- Check that the wiring connection is secure.
- Confirm receiver placement, if applicable, before closing the canopy.
- Finish the blade assembly: Attach the blade assembly and verify each blade is securely fastened before fitting the light kit.
- Attach the light kit: Install the light kit and confirm it is securely fitted before restoring power.
- Perform the balance check and testing: Restore power after assembly is complete, then complete a functional test. Verify wobble, light operation, fan speeds, and unusual noise before the installation is considered complete.
Installation mistakes that create unsafe or poor fit
Installation mistakes commonly occur when support, clearance, or electrical requirements are overlooked before assembly. Identifying these preventable requirement failures by cause, affected attribute, and prevention can help reduce unsafe support, poor fit, and unreliable fan or light operation.
Mechanical installation mistakes typically affect support, mounting height, clearance, or hardware security, while electrical mistakes often involve wiring assumptions or mismatched controls. Reviewing these categories before installation helps reduce preventable risks without assigning blame.
If wobble, unusual noise, or inconsistent light operation appears after installation, the cause may involve more than one installation factor. Further troubleshooting or qualified assessment may be appropriate because symptoms can overlap.
| Mistake | Affected Attribute | Risk or Prevention |
|---|---|---|
| Wrong box selection | Support | A wrong box can create unsafe support. Confirm the mounting point is suitable before installation. |
| Weak support | Stability | Weak support may contribute to vibration. Verify the supporting structure before mounting. |
| Poor mounting height | Clearance | Insufficient mounting height can increase clearance or collision risk. Check available space before installation. |
| Skipped clearance checks | Blade path | Missing clearance checks may increase the risk of blade contact. Confirm surrounding clearances before assembly. |
| Loose hardware | Mounting security | Loose hardware may contribute to wobble. Complete a final hardware check before testing. |
| Incorrect wiring assumptions | Light operation and controls | Assuming existing wiring is suitable may affect fan or light operation. Verify wiring compatibility before connection. |
| Mismatched controls | Control configuration | Control compatibility depends on the installation. Confirm the selected controls match the intended configuration before testing. |
Wrong box, weak support, and poor mounting height
Wrong box selection, weak support, and poor mounting height create mechanical risk because they can affect movement, vibration, collision risk, and usable clearance. Recognizing these conditions early helps prevent poor fit by linking each mechanical issue to the appropriate support or clearance check before installation continues.
Symptoms such as vibration, movement, or reduced blade clearance should be assessed alongside earlier support and clearance checks because more than one mechanical condition may contribute to the same outcome. The focus is on recognizing local installation errors rather than providing repair methods.
- Wrong box: A non-fan-rated box may not be suitable for fan movement and can increase vibration risk. Confirm box suitability before mounting.
- Weak support: Plasterboard-only fixing or other weak support can allow movement, so the mounting support should be verified before the fan is attached.
- Loose bracket: A loose bracket may contribute to movement or vibration. Confirm mounting security before completing the installation.
- Poor mounting height: Low mounting or incorrect blade height can reduce clearance and usable headroom, so blade clearance should be checked before final assembly.
- Oversized light drop: A large light drop may reduce usable clearance and increase collision risk, so the completed hanging height should be assessed before normal operation.
Wiring errors that affect the fan or light
Wiring errors can affect fan operation, light operation, control behavior, and electrical safety, so installation-related symptoms should be interpreted by likely cause and risk rather than guesswork. Identifying the connection issue first helps distinguish a wiring mistake from a mechanical installation problem.
If fan or light problems continue after installation checks, or if symptoms suggest hidden wiring issues, further assessment by a qualified electrician may be appropriate because the cause may not be visible at the mounting point.
| Wiring Error | Possible Effect | Interpretation |
|---|---|---|
| Loose connections | Fan operation or light operation may become inconsistent. | A connection issue can affect operation and may create an electrical safety risk. |
| Incompatible dimmer | Light flicker or unexpected control behavior may occur. | Control compatibility depends on the light and control configuration. |
| Receiver misplacement | Remote control response may become unreliable. | Receiver placement and available canopy space can influence control behavior. |
| Shared switch confusion | Fan speed and light control may not operate as intended. | The shared switch arrangement should match the intended control configuration. |
| Insufficient canopy space | Receiver placement may be restricted. | Limited canopy space can contribute to receiver-related installation issues. |
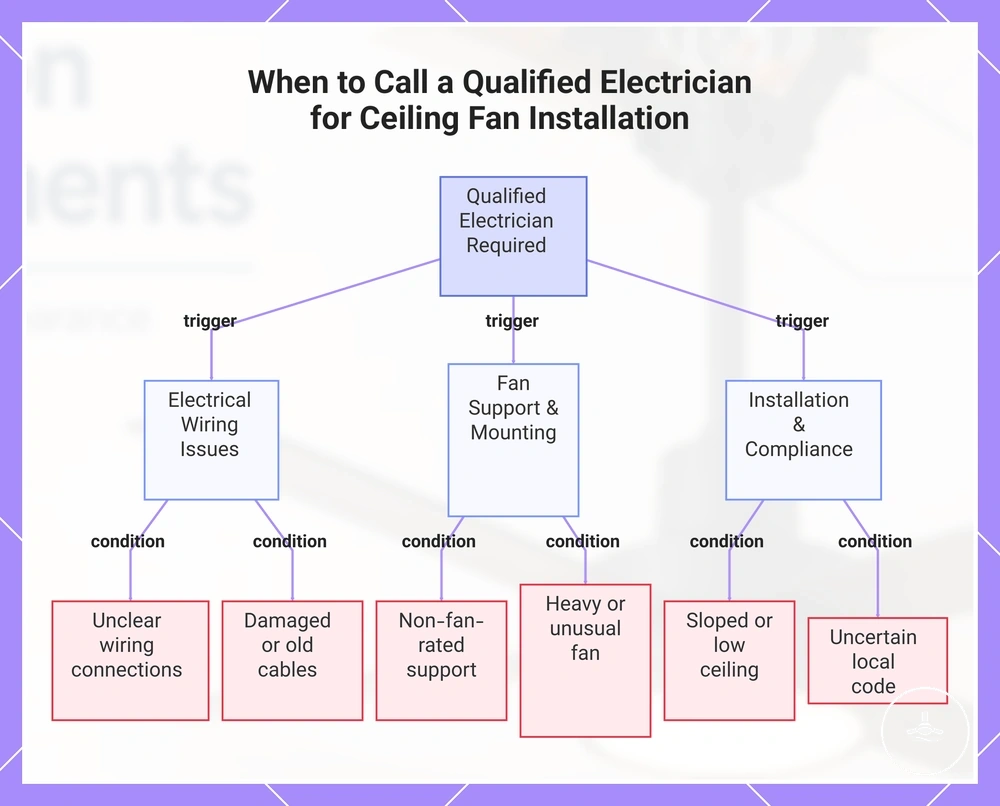
When a qualified electrician is required
A qualified electrician is required when wiring, fixed wiring, support, compliance, or safety conditions are uncertain. Installation should move from self-assessment to professional assessment when the condition cannot be verified safely or when electrical work may affect fixed wiring.
Common escalation triggers include unclear wiring, damaged cables, non-fan-rated support, heavy or unusual fan assemblies, and installation complications from sloped or low ceilings. Code uncertainty can also require a licensed electrician or trade professional because local requirements may vary by installation and region.
The checklist below organises risk conditions that should not be guessed through:
- Unclear wiring: unclear wiring can create safety risk because the intended fan and light connection may not match the existing circuit.
- Fixed wiring changes: any need to alter fixed wiring should be assessed by a qualified electrician because connection work may involve compliance requirements.
- Damaged cables: old or damaged cables require professional assessment because visible damage may indicate a wider electrical safety issue.
- Non-fan-rated support: non-fan-rated support should not be treated as suitable because the fan may need structural assessment before installation continues.
- Heavy or unusual fan: a heavy or unusual fan may require trade professional input because support and mounting conditions can vary.
- Sloped or low-ceiling complications: sloped ceiling or low ceiling conditions may require professional inspection when angle, clearance, or mounting suitability is uncertain.
- Code uncertainty: code uncertainty should be resolved before installation because local compliance and licensing requirements may apply.
After safe installation, maintenance after installation should include periodic checks, cleaning, and ongoing care.
This chart shows the main conditions that require professional electrical assessment when installing a ceiling fan.