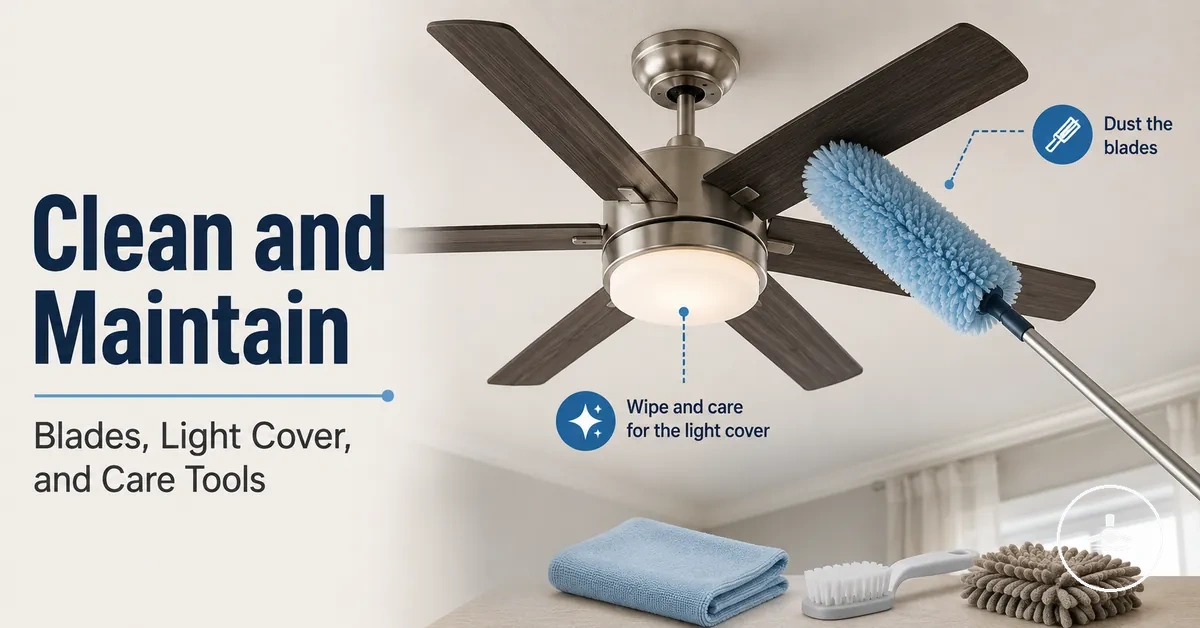
Ceiling Fan with Light Cleaning and Maintenance
Ceiling fan with light cleaning and maintenance is routine care for the blades, light cover, motor housing, controls, balance, and visible fittings. Cleaning manages dust buildup and part visibility with safe access before task-level cleaning begins. This page frames routine care rather than repair.
Dust often becomes noticeable when fan blades look coated, the light cover or bulb area loses clarity, the motor housing gathers residue, or controls and remote response feel less consistent. The ceiling fans with lights guide gives the broader room, lighting, control, and fit context before this page focuses on cleaning and maintenance. These visible signals prepare the fan for part-based maintenance instead of a single cleaning method.
Cleaning can reveal wobble, loose parts, light behaviour, or control response changes, but those signs do not diagnose electrical faults. Routine cleaning is separate from installation checks and electrical diagnosis because model design, mounting condition, lighting type, and access can change what should be handled safely.
Maintenance means regular visible care. It keeps the ceiling fan with light easier to inspect without turning cleaning into troubleshooting.
Ceiling Fan Parts That Need Regular Cleaning and Care
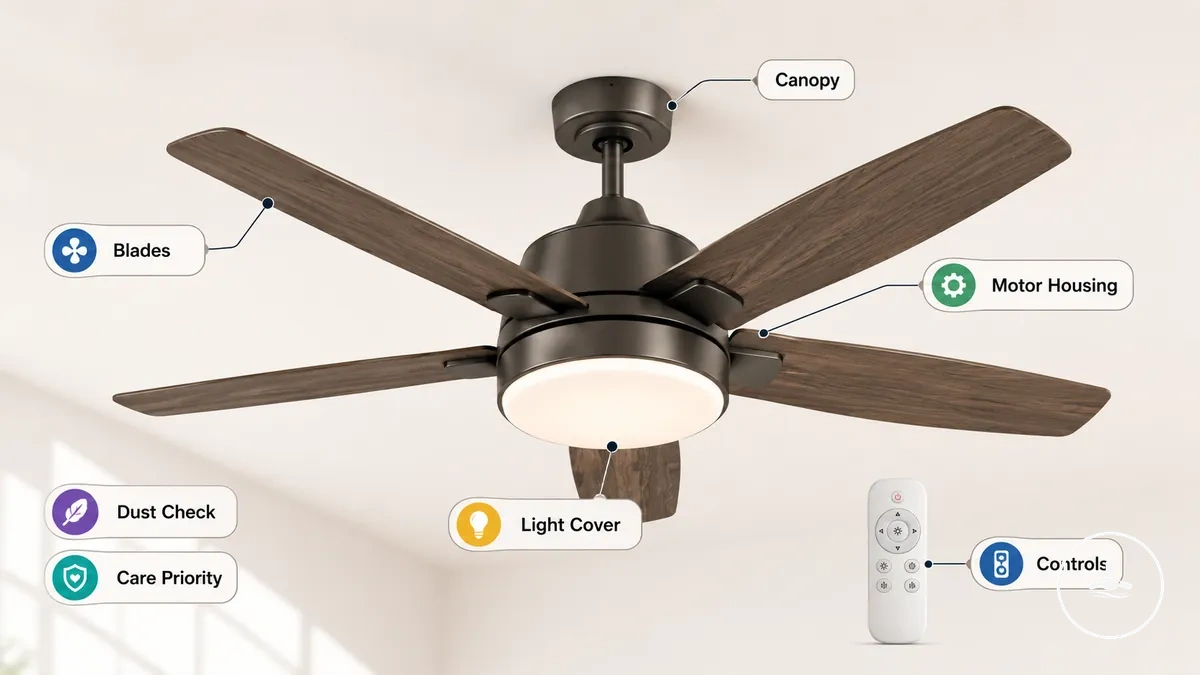
Ceiling fan with light maintenance covers the parts that collect dust, move air, hold lighting components, or receive control signals. Blades, the light cover, the motor housing, the bulb area, controls, and visible fittings may need different cleaning pressure and inspection frequency depending on their condition, mounting, and design. Each part has a different care priority.
Dust, heat, movement, and regular handling can affect each component differently. Blades may collect surface dust from airflow, while a light cover may develop haze or fingerprints that reduce visibility, and controls or a remote may show maintenance signals through reduced response. Ceiling Fan Parts That Need Regular Cleaning and Care becomes easier to understand when each component is grouped by its visible condition and care priority.
Visible condition is usually the best guide for routine care because it helps identify where attention is needed without assuming every model uses the same light cover, bulb area, or control layout. Routine inspection supports cleaning decisions but does not replace repair or electrical assessment.
Ceiling Fan Parts That Need Regular Cleaning and Care can be organised by component and visible condition as shown below.
| Part or component | Common condition | Care priority | Caution |
|---|---|---|---|
| Blades | Surface dust from movement | Regular cleaning | Use suitable cleaning pressure to help maintain balance. |
| Light cover | Dust, haze, or fingerprints | Clean when visibility is affected | Handle carefully because cover materials may vary. |
| Bulb area | Dust near lighting components | Routine inspection | Heat exposure may differ between lighting designs. |
| Motor housing | Visible dust buildup | Gentle surface wiping | Avoid treating external cleaning as internal servicing. |
| Canopy | Dust around the mount area | Visible inspection | Looseness may need assessment beyond routine cleaning. |
| Controls | Dust or reduced response | Routine cleaning and observation | Visible care does not diagnose electrical faults. |
| Remote | Dust or handling marks | Light routine cleaning | Response changes may have causes beyond visible condition. |
If your ceiling fan with light uses integrated lighting or a different light cover design, see LED lighting care considerations for additional lighting-related maintenance context.
Safe Preparation and Cleaning Tools
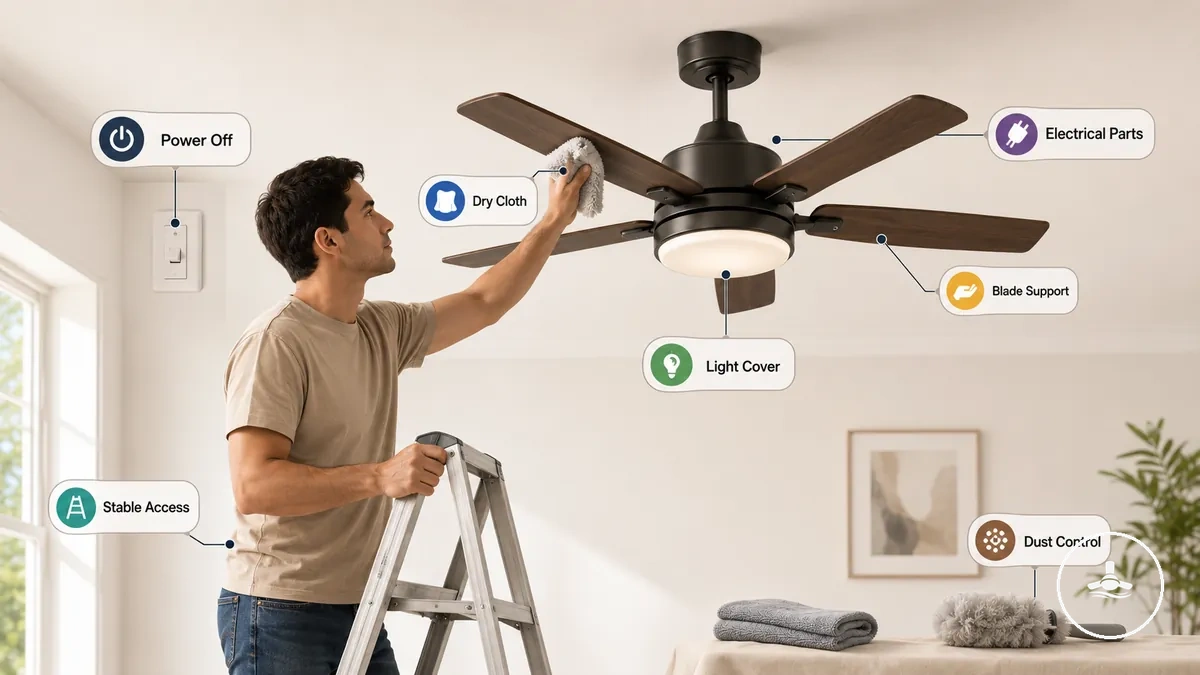
Safe preparation starts by turning the ceiling fan with light power off before cleaning begins. Wait until the fan has stopped completely and the cool light can be handled comfortably if it has been operating. Confirm both stable access and power status before touching the fan or light cover.
Height, heat, glass, and dust spread can change how the fan should be approached. A stable cleaning position, suitable cleaning tools, and careful handling of the light cover help reduce unnecessary risk while protecting visible parts. Safe Preparation and Cleaning Tools begins with the checklist below before any cleaning takes place.
- Confirm the power off status before touching the fan or light.
- Allow the cool light and light cover to cool if the fan has been running recently.
- Use stable access, such as a suitable step ladder, for the ceiling height.
- Use a dry cloth, microfiber cloth, or duster, and keep liquids away from electrical parts.
- Provide gentle blade support while cleaning to avoid unnecessary pressure on the blade arm.
- Handle a glass or fragile light cover carefully, especially if it appears loose.
- Limit dust spread by collecting dust rather than brushing it into the room.
- Stop cleaning if you notice loose fittings, visible damage, or unclear electrical symptoms.
If the fan is installed on a high ceiling, has a fragile cover, or shows unclear electrical symptoms, extra caution may be appropriate because access and condition can vary. Routine cleaning should not include opening sealed electrical components. For installation-related limits, refer to installation requirements.
A dry cloth, microfiber cloth, or duster is usually suitable for visible surfaces. Choose the cleaning tool according to the fan finish and light cover material while avoiding liquids near electrical parts.
How to Clean Ceiling Fan Blades Without Spreading Dust
Cleaning ceiling fan blades starts with supporting each blade while removing dust gently to help contain dust and protect the blade surface. The cleaning method depends on dust level, blade material, finish, and how easily the blades can be reached. Controlled movement helps reduce dust spread during blade cleaning.
Light dust usually needs less effort than thicker buildup, while delicate finishes may respond better to a microfiber cloth or soft duster than more aggressive cleaning. Reach, blade finish, and dust thickness influence the cleaning method and pressure. How to Clean Ceiling Fan Blades Without Spreading Dust is illustrated below to show blade support and dust containment before the cleaning steps.
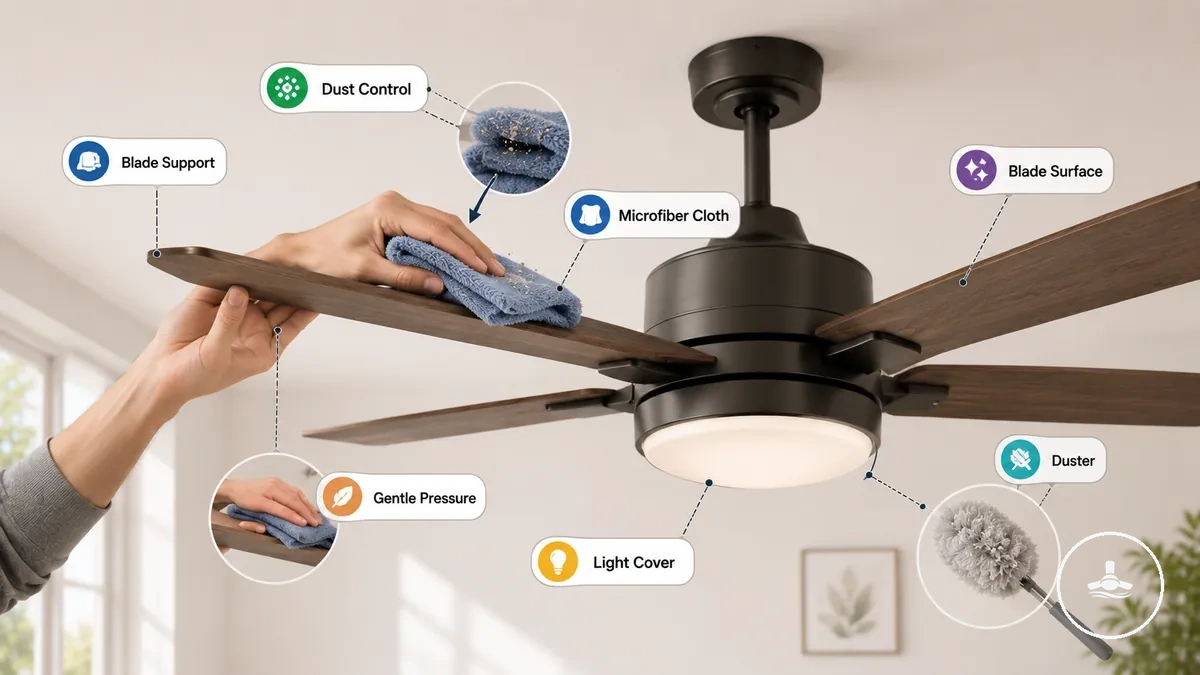
- Support the ceiling fan blade with one hand and clean the blade surface using a microfiber cloth or duster with gentle pressure.
- For light dust, wipe from the blade base toward the tip using slow, controlled strokes to help contain dust.
- For thicker dust, collect the buildup with the cloth or duster before moving to the next section of the blade instead of brushing dust into the air.
- If sticky buildup remains, use a lightly damp microfiber cloth only when appropriate for the blade finish, then dry the blade surface promptly without soaking it.
- Repeat the same method for each blade while supporting the blade arm to reduce unnecessary movement and lower the chance of loosening parts.
- Inspect the blade surface after cleaning and remove any remaining dust with a final gentle pass instead of applying extra pressure.
If dust falls toward the light cover during cleaning, collect it before continuing so it does not accumulate around the lighting area. Sticky buildup may need additional gentle passes because finish sensitivity can vary. Avoid harsh chemicals, soaking the blades, or over-bending the blade arm, and maintain gentle pressure throughout the cleaning process.
How to Clean Light Covers and the Lighting Area
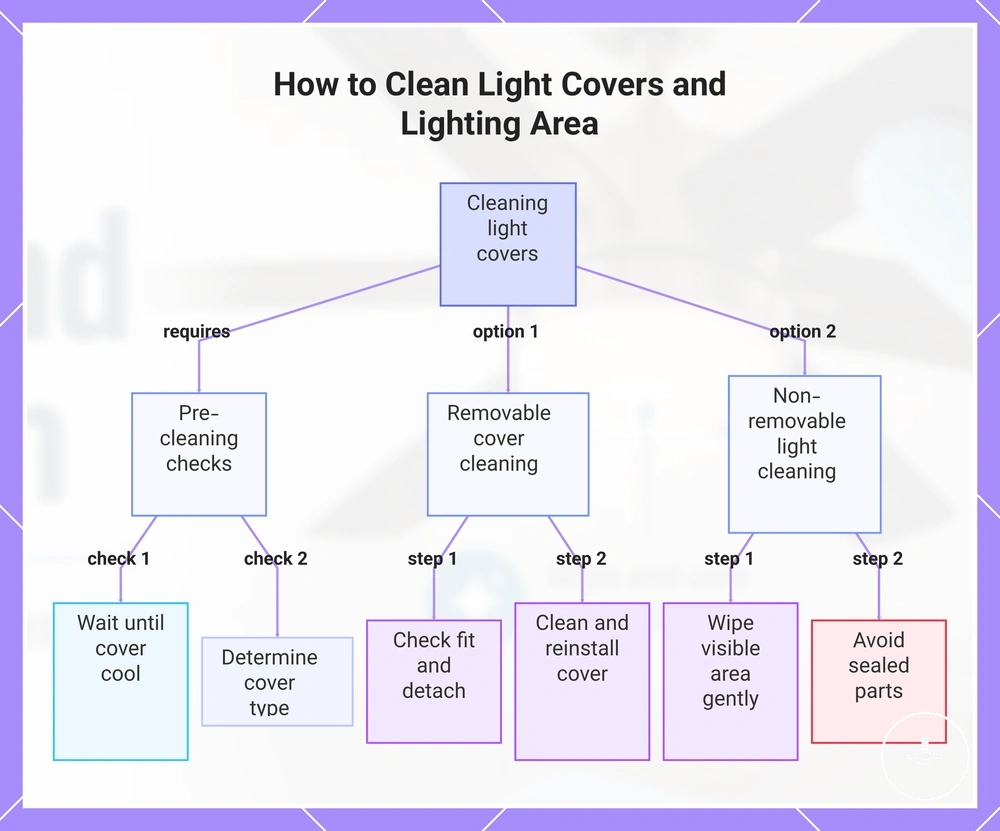
Cleaning the light cover and lighting area starts only after the light is switched off, the cool light is safe to handle, and bulb heat has dissipated. Wait until the light cover can be touched comfortably before cleaning. The cleaning method depends on the cover type and whether the lighting area uses a removable cover or an integrated light.
A removable cover can usually be cleaned separately, while a non-removable or integrated light is normally cleaned in place. Cover fit, light cover material, and LED module sensitivity may affect how the lighting area should be handled. Wiping an installed cover is suitable for routine dust buildup, while removing a removable cover may be appropriate for deeper cleaning when the cover fit allows. Follow these steps for removable covers.
- Confirm the light cover is cool, then check the cover fit before attempting removal.
- If the removable cover can be detached without force, support it carefully and clean dust buildup, fingerprints, or insects with a soft cloth using gentle handling.
- Clean both sides of the removable cover when accessible, then dry it before refitting if moisture was used.
- Reinstall the removable cover carefully, making sure it sits correctly without forcing the cover into place.
- For a non-removable or integrated light, wipe the visible lighting area gently without attempting to remove sealed parts.
- Clean fingerprints, insects, haze, and dust buildup with a soft cloth while avoiding unnecessary pressure on the diffuser or light cover.
- If the lighting area contains a sealed LED module or the cover fit is unclear, limit cleaning to accessible exterior surfaces.
Fingerprints, insects, haze, and dust buildup can reduce the clarity of the light cover over time. Cleaning these visible deposits helps improve visibility while keeping the lighting area safe to handle. The cleaning method should match the light cover material and its condition rather than assuming every cover detaches in the same way.
If the lighting area uses a sealed LED module or the cover fit is uncertain, do not dismantle sealed parts because access may vary by design. For additional LED-specific boundaries, see LED lighting care considerations.
This chart shows the main steps and checks for cleaning light covers, including prerequisite safety checks and procedures for removable and non-removable lighting areas.
Cleaning the Motor Housing, Mount, and Fan Accessories
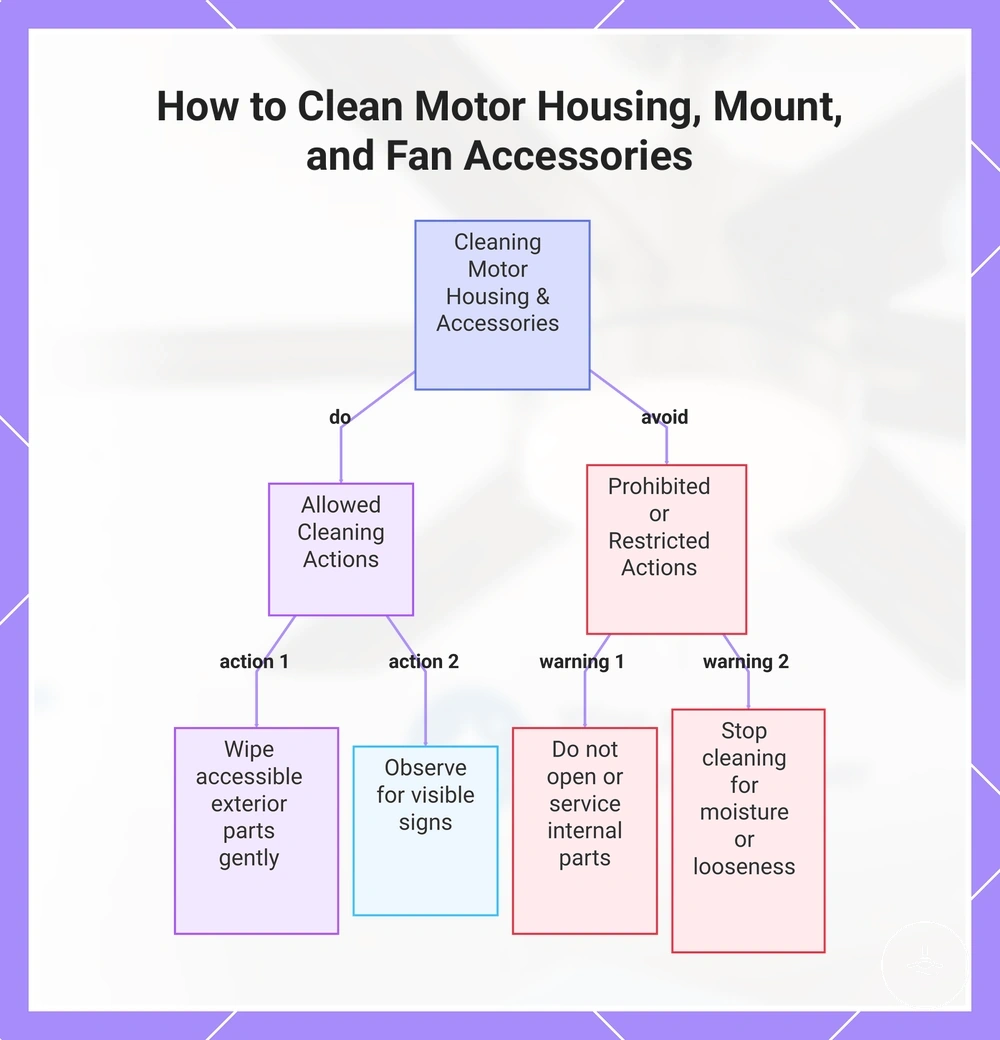
Cleaning the motor housing, canopy, mount area, and fan accessories covers only the visible fixed parts around the ceiling fan. Gentle wiping helps remove dust and keeps these components easier to observe during routine maintenance. Internal components should remain closed because this section does not cover servicing or repairs.
Dust, looseness, moisture exposure, and access limits can differ between the motor housing, canopy, visible mount area, pull chain, remote receiver cover, and decorative trim. Clean accessible surfaces with gentle wiping and watch for visible signs such as unusual movement, grime, or moisture rather than treating them as repair points. The checklist below separates suitable cleaning actions from situations where cleaning should stop.
- Do: Wipe the motor housing gently to remove surface dust. Avoid: Opening the motor housing or servicing internal parts.
- Do: Clean the canopy and visible mount area with a soft cloth. Avoid: Treating surface dust as evidence of a structural or electrical issue.
- Do: Remove grime from the pull chain and decorative trim using gentle wiping. Avoid: Applying force if looseness is visible.
- Do: Wipe dust from the remote receiver cover where it is externally accessible. Avoid: Adjusting wiring or opening enclosed components.
- Do: Stop cleaning if moisture exposure or unusual visible signs raise concern. Avoid: Assuming routine cleaning confirms structural safety.
If dust collects near the mount area, clean only the accessible exterior surfaces and continue observing visible signs rather than treating the area as an installation check. Dust on the pull chain or remote receiver cover can usually be removed with gentle wiping, while looseness or moisture exposure may require qualified assessment instead of further cleaning. For structural boundaries, see installation requirements.
This chart separates the recommended cleaning actions from the actions to avoid when cleaning the motor housing, mount, and fan accessories.
Routine Maintenance Checks After Cleaning
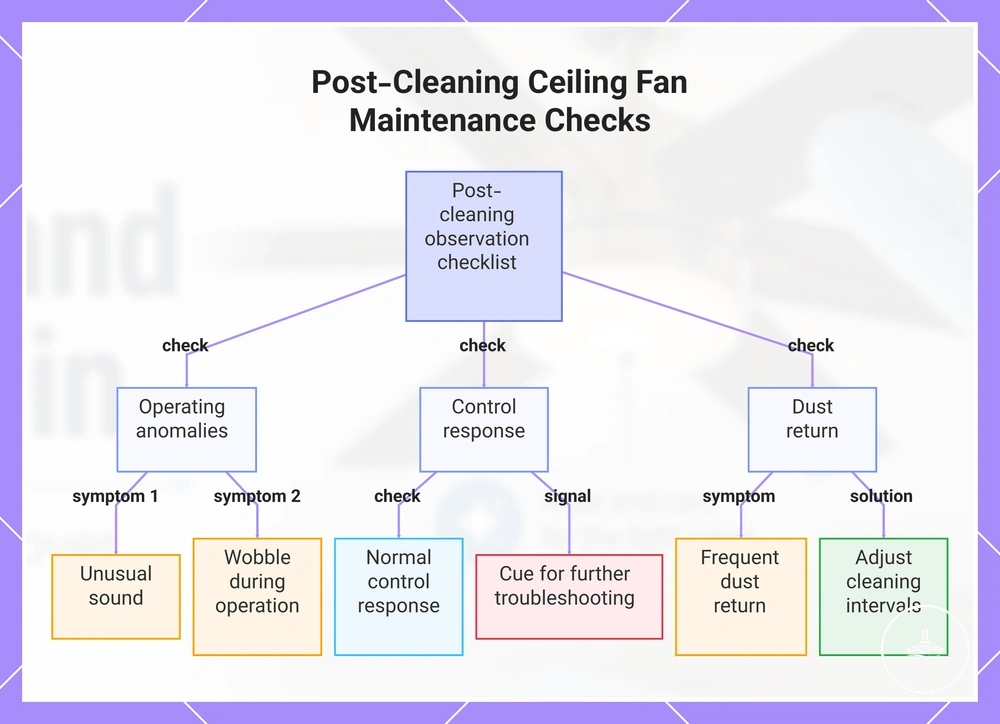
Routine maintenance after cleaning should focus on visual and gentle post-cleaning checks rather than repair. A post-cleaning check helps you observe the visible condition of the fan without diagnosing faults. Routine observation should remain model-aware and limited to accessible components.
Screws, covers, bulbs, control response, sound, wobble, and visible dust return can provide simple maintenance signals after cleaning. These observations help identify whether routine care appears complete or whether a condition may need further attention without assuming a cause. Use the compact checklist below to separate normal observation from the next safe action.
- Check blades for a clean visible condition and consistent appearance. If dust returns quickly, review cleaning frequency and room conditions as the next safe action.
- Check visible screws and covers for obvious looseness. If anything appears loose, avoid tightening beyond routine observation and consider further assessment.
- Check bulbs and light operation for normal response. If light response appears unusual, treat it as a maintenance signal rather than an electrical diagnosis.
- Check control response using the normal controls or remote. If response changes persist, use that as a cue for further troubleshooting rather than repeated cleaning.
- Listen for unusual sound during normal operation. If new noise continues after cleaning, the next safe action may be further inspection.
- Observe for wobble during operation. If wobble continues, avoid assuming cleaning caused or resolved the condition.
- Watch for visible dust return after normal room use. Frequent dust buildup may indicate the need to adjust routine maintenance intervals.
If repeated sound, wobble, control response issues, or other persistent changes continue after a post-cleaning check, the condition may be moving beyond routine maintenance into troubleshooting. Use routine observation to recognise maintenance signals, then choose the next safe action instead of treating cleaning as a repair.
This chart shows the key visual and operational checks after cleaning a ceiling fan, and the signals that indicate whether routine maintenance is complete or further action is needed.
Blade Balance and Wobble Checks
Blade balance should be checked gently after cleaning because routine maintenance can make wobble or uneven movement easier to notice. This local check focuses on blade balance and visible blade hardware without extending into internal servicing or repair.
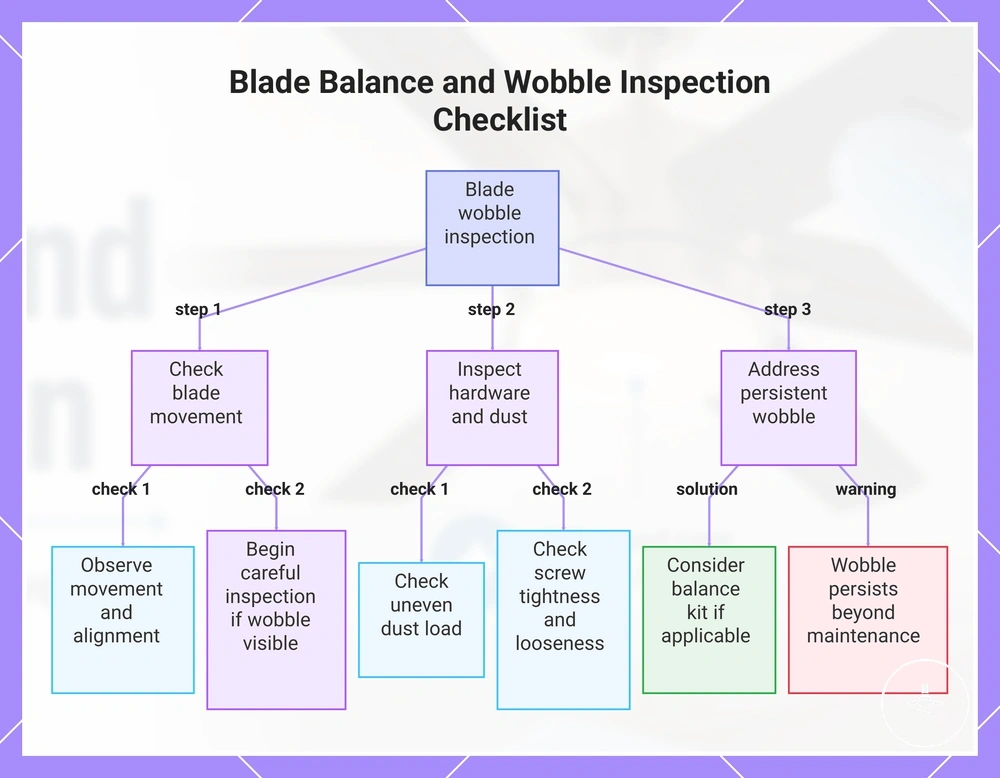
Blade balance may be influenced by uneven dust, blade hardware, alignment, screw tightness, dust load, or previous impact. Careful inspection can help identify visible looseness or uneven movement, while a balance kit may be considered when it suits the model and wobble continues after routine cleaning. Use the checklist below to guide local observation.
- Check blade balance for steady movement. If wobble is visible, begin with careful inspection rather than assuming a cause.
- Look for uneven dust or an uneven dust load across the blades. If one blade differs noticeably, review blade movement and cleaning results together.
- Inspect blade hardware for visible looseness and check accessible screw tightness. If looseness is present, avoid assuming routine cleaning will resolve the wobble.
- Observe alignment and overall blade movement. If previous impact is suspected or wobble continues, a balance kit may be considered where appropriate for the model.
If wobble remains after careful inspection, the condition may extend beyond routine maintenance and should not be treated as something balancing alone will resolve. For installation-related boundaries, see installation requirements.
This chart shows the step-by-step inspection process for diagnosing blade wobble, including checks for movement, dust load, hardware, and next steps if wobble persists.
Loose Screws, Bulbs, Covers, and Controls
Only visible and safely accessible looseness should be checked after cleaning. Inspect loose parts gently and avoid forced handling because cover fit and component access can vary between models.
Loose screws, bulb seating, cover fit, pull chain movement, remote response, and wall-control behavior can provide simple maintenance signals after cleaning. A cautious check helps distinguish visible looseness from symptoms that may need escalation without assuming a specific cause. Use the checklist below for routine inspection.
- Check loose screws for visible looseness where they are safely accessible. If a screw appears loose or damaged, avoid forcing it and consider escalation if the condition persists.
- Check bulb seating and cover fit for a secure visible position. If a bulb or light cover does not sit correctly, stop if safe access is uncertain.
- Observe the pull chain for smooth movement and excessive grime. If movement remains unusual after cleaning, treat it as a maintenance signal rather than a repair task.
- Test remote response and wall-control behavior during normal operation. If control response remains inconsistent, avoid assuming a receiver fault or attempting internal repairs.
- Check for visible looseness across accessible parts. If repeated symptoms continue despite a cautious check, further assessment may be appropriate.
If the light does not operate after routine inspection, see ceiling fan light not working. If the light flickers after visible checks are complete, see flickering ceiling fan light for troubleshooting beyond routine maintenance.
Cleaning Frequency and Dust Buildup Signals
Cleaning frequency depends on visible dust, room conditions, season, and how the ceiling fan with light is used. Dust buildup on the blades or light area is a more practical guide than a fixed timetable. Cleaning timing should be adjusted when visible buildup or room conditions change.
Lightly used rooms may collect dust more slowly than rooms with frequent fan use, while humidity, pet hair, seasonal changes, or visible light-cover haze can increase the inspection need. Daily fan use or heavier dust levels may justify more frequent inspection, but the cleaning interval depends on visible conditions rather than a universal schedule. The table below organizes Cleaning Frequency and Dust Buildup Signals by use conditions and visible buildup.
| Condition | Buildup signal | Suggested response |
|---|---|---|
| Lightly used room | Little visible dust on blades or light cover | Inspect occasionally and clean when buildup becomes noticeable. |
| Frequent fan use | Visible dust collecting on blades | Increase inspection frequency and clean when dust affects appearance. |
| Visible light-cover haze | Dust or fingerprints reducing clarity | Inspect the light area and clean when haze becomes noticeable. |
| Higher humidity | Dust adhering more readily to surfaces | Check accessible surfaces more often and clean as needed. |
| Pet hair | Hair and dust collecting around blades or fittings | Inspect for visible buildup more frequently and clean when accumulation is noticeable. |
Dust buildup signals provide a practical way to decide when routine cleaning is needed without relying on an exact schedule. Visible dust, light-cover haze, seasonal conditions, and changing room use offer better maintenance cues than a fixed calendar. Cleaning frequency should remain flexible because buildup varies with room conditions and usage patterns.
Common Cleaning Mistakes That Affect Fan Care
Cleaning mistakes usually involve too much force, too much moisture, or unsafe handling rather than routine maintenance itself. These avoidable mistakes may make ceiling fan with light care less effective or create maintenance issues depending on the material, moisture, heat, and cover fit. Matching each mistake to the part it affects is a practical way to prevent common errors.
Common Cleaning Mistakes That Affect Fan Care often involve blades, light covers, lighting areas, or controls. Over-wetting, harsh chemicals, bending blades, forcing light covers, cleaning a hot light, ignoring wobble, and dropping debris into the lighting area each affect different components for different reasons. The table below matches each mistake with the affected part, why it matters, and a safer alternative.
| Mistake | Part affected | Why it matters | Safer alternative |
|---|---|---|---|
| Over-wetting | Electrical parts and nearby surfaces | Too much moisture may reach areas that are not intended for wet cleaning. | Use a dry or lightly damp cloth when appropriate. |
| Harsh chemicals | Blade finish and light cover | Strong cleaners may not be suitable for every finish or cover material. | Choose a gentle method suited to the surface. |
| Bending blades | Blades and blade arm | Excessive force may contribute to uneven movement or wobble. | Support the blade and clean with gentle pressure. |
| Forcing light covers | Light cover and cover fit | If the cover resists removal, forcing it may increase the risk of damage. | Stop and clean only accessible surfaces when the fit is uncertain. |
| Cleaning while the light is hot | Hot light and light cover | Bulb heat can make handling less comfortable and increase the chance of unsafe handling. | Wait until the light has cooled before cleaning. |
| Ignoring wobble | Blades and visible hardware | Persistent wobble may indicate that further inspection is appropriate. | Carry out a gentle visual check before continuing normal use. |
| Dropping debris into the lighting area | Lighting area | Dust and debris may collect around accessible lighting components. | Capture debris while cleaning instead of brushing it into the light area. |
Stronger cleaning is not always more effective than a gentle method. Matching the cleaning method to the part being cleaned is usually a safer alternative than applying extra force, moisture, or strong cleaners.
When Maintenance Becomes a Repair or Troubleshooting Issue
When persistent symptoms remain after cleaning, they should be treated as troubleshooting signals rather than routine maintenance. Cleaning and routine care are no longer enough once the same symptom continues after accessible parts have been cleaned and visually checked. At that point, the maintenance boundary has been reached and a separate diagnostic path or qualified help may be appropriate.
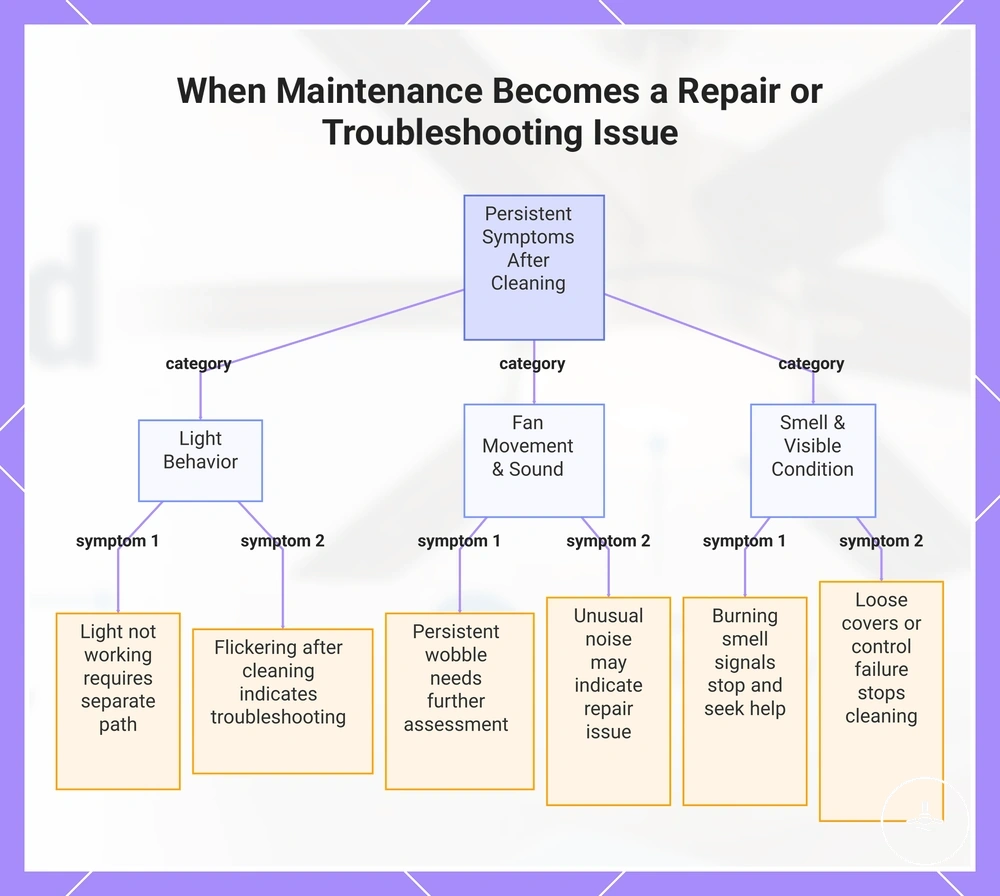
When Maintenance Becomes a Repair or Troubleshooting Issue is easier to recognise by separating light behavior, fan movement, sound, smell, and visible mounting condition. Different symptoms may have different causes, so routine maintenance should not be used to identify an exact fault or attempt electrical repair. The diagnostic points below distinguish maintenance observations from troubleshooting signals.
- Light not working: If the light remains off after routine maintenance, the issue has moved beyond cleaning. Follow a separate diagnostic path rather than repeating routine care.
- Flickering: If flickering continues after cleaning, it may indicate a maintenance issue that requires troubleshooting instead of further cleaning.
- Burning smell: Treat a burning smell as a stop signal. Stop using the fan because the symptom may indicate an electrical concern that requires qualified help.
- Persistent wobble: If wobble continues after cleaning and a visual inspection, further assessment may be appropriate because the movement is no longer limited to routine maintenance.
- Unusual noise: Continued unusual noise after cleaning may indicate a repair issue. Avoid assuming a specific cause and use the symptom to guide the next diagnostic path.
- Loose covers or control failure: If visible covers remain loose or normal control response does not return after routine checks, stop further cleaning and consider qualified help.
If symptoms continue after routine maintenance, stop cleaning instead of attempting electrical, installation, or component diagnosis. For a light that remains off, see ceiling fan light not working. If the symptom is ongoing flickering, see flickering ceiling fan light for the appropriate diagnostic path, as the next step depends on the symptom and fan configuration.
This chart shows the specific symptoms that indicate a shift from routine maintenance to troubleshooting or repair, grouped by category, and the recommended action for each.